Shadowrocket
Setup Guide
Start with your existing configuration, then add a server, choose Global Routing, and verify the connection. Get a single connection working first, then adjust rules and On Demand conditions.
01 · Add a Server or Import a Subscription
Check what information you have, then choose the matching import method.
Open Shadowrocket, go to Home, and tap Add Server. Before you begin, identify what you have: a subscription URL, details for a single server, or a full configuration file. A subscription keeps a group of server entries up to date; individual server details create one connection; a configuration file may include rules and other settings. These are different things. Don’t enter an entire configuration as Host or use a webpage’s information URL as a subscription URL.
Have a Subscription? Choose Subscribe
In Add Server, tap Type and choose Subscribe. Paste your full subscription URL into the address field, check it, and save. Preserve the original path, parameters, and capitalization. Watch for spaces, line breaks, or non-URL punctuation accidentally included when copying. Subscription URLs may contain access credentials, so don’t share them in public comments, screenshots, or logs.
After saving, return to Home and wait for the subscription to load. Check whether server entries appear in the relevant group. If you see a subscription group but no selectable servers, check the subscription update result first; a successful save doesn’t mean the server details were retrieved. Before updating later, consider any local changes you’ve made to the entries. Retrieved content may change the entries and their settings.
Have Server Details? Fill In the Fields for the Matching Type
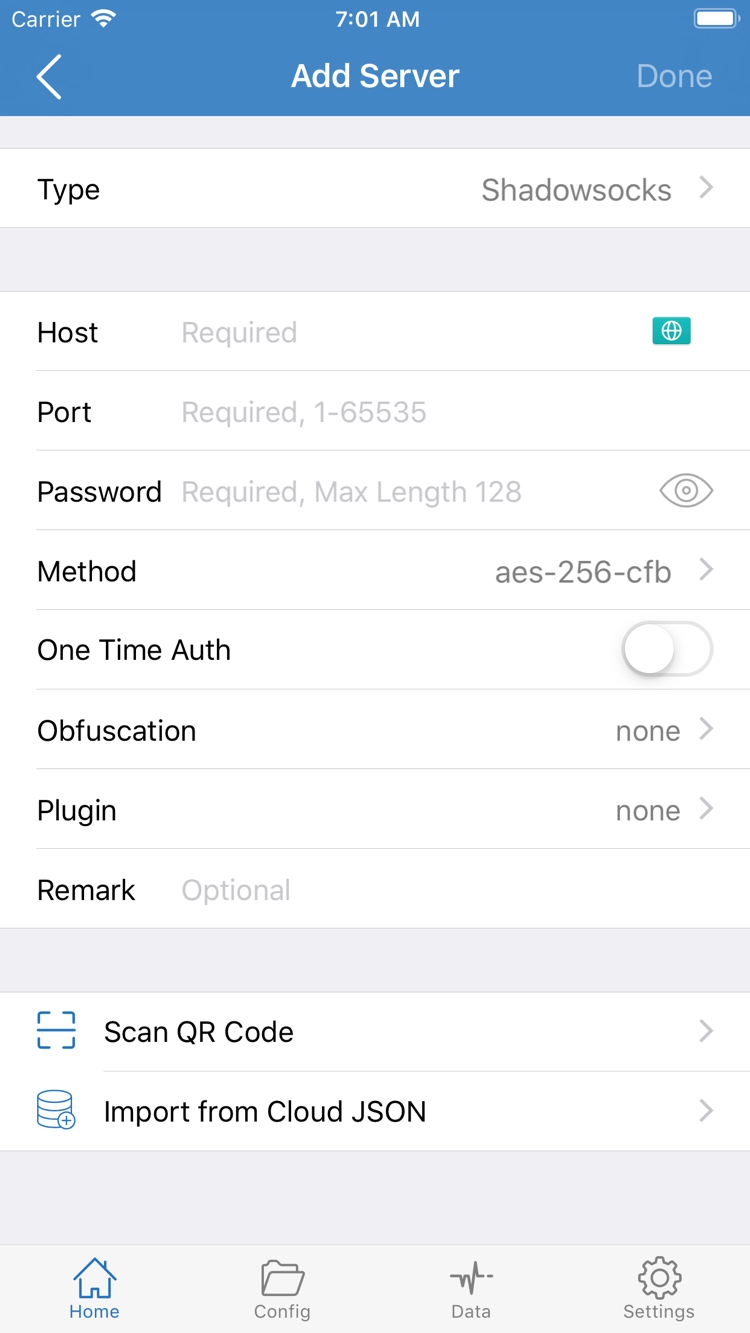
If you have details for one server, choose the protocol that matches the source information under Type in Add Server. Then enter Host, Port, and the required authentication fields. The official screenshot shows one form with Password and Method; the required fields vary by Type, and not every protocol uses the same ones. Host is usually a server domain or address, not a webpage path. Enter the original Port number and check Password, Method, and other fields against your details.
If the selected Type also requires TLS, a transport mode, or other parameters, use the values in your existing details rather than guessing. Protocols such as WireGuard have a different field layout; don’t try to force the Password and Method fields shown in the screenshot onto them. If you have a QR code, use Scan QR Code. Import from Cloud JSON only works with the corresponding existing format; it isn’t a general-purpose way to paste any link.
After saving, return to Home and find the new entry under SERVER or the relevant subscription group. Tap the entry you want to use. Don’t import a large number of duplicates or change every setting at once. Keep one configuration with a clear source and verifiable fields so you can check the connection in the next steps. If the imported result isn’t what you expected, resolve the information type or field issue before configuring routing.
02 · Choose a Global Routing Mode
The server determines the connection endpoint; the mode and rules determine how requests are handled.
After adding a server, return to Home and tap Global Routing. The three common modes are Config, Proxy, and Direct. Decide what you want to test before choosing a mode. Having a server selected doesn’t mean every request will go through it. The mode changes how requests are handled, so note your selection when troubleshooting later.
Config: Apply the Rules in the Active Configuration
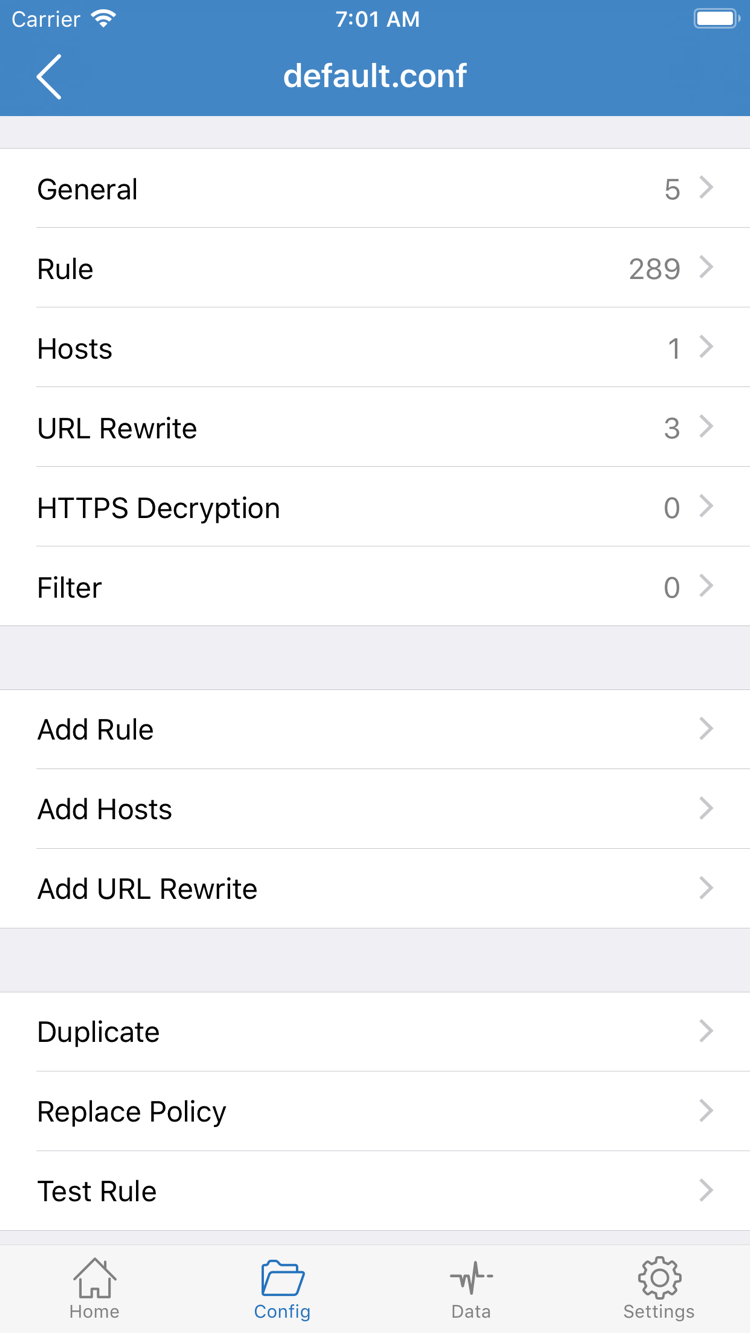
For rule-based routing in everyday use, choose Config and open the Config page to confirm which configuration file is active. The configuration list and the file editor are separate screens: first identify the active file, then open it to review its contents. Editing a different file may not affect the current connection. The official screenshot shows a configuration editor with sections such as General, Rule, Hosts, URL Rewrite, and HTTPS Decryption, plus Add Rule.
To get started, focus on the rules in Rule. Rules are generally matched from top to bottom, and the policy for the first match is applied. FINAL handles requests that don’t match earlier rules. PROXY, DIRECT, and REJECT mean route through a proxy, connect directly, and reject the request. Configuration files can include many other options, but seeing a setting doesn’t mean you need to change it. In particular, don’t enable features unrelated to your goal just to test your first connection.
# Standalone teaching example; understand it before merging it into your configuration
[Rule]
DOMAIN-SUFFIX,example.com,PROXY
IP-CIDR,192.168.0.0/16,DIRECT,no-resolve
FINAL,DIRECT
The example above routes example.com and its subdomains through PROXY, sends the listed local networks through DIRECT, and sends all other requests to FINAL,DIRECT. It illustrates matching order; it is not a recommendation to replace your entire active configuration. The example domain is not a connection server, and PROXY does not create a server entry. Back up your active file before editing it so you don’t overwrite existing rules.
Proxy and Direct: Compare How They Work
Proxy makes proxy routing the primary handling mode, which can help temporarily rule out interference from standard routing rules during a test. It doesn’t mean that all system traffic necessarily goes through the proxy. Direct handles requests using a direct connection, so it can’t confirm that the selected proxy server is working. If Proxy works but Config doesn’t, first check the active configuration and matched rules. If both fail, check the server details and network conditions.
After choosing a mode, note the active configuration, selected server, and Global Routing mode. Change only one condition at a time during testing so you can identify the cause. For more about rule types, priority, and configuration sections, see Rules and Configuration Reference. For now, keep changes to a minimum and continue to connect.
03 · Turn On the Home Connection Switch
Confirm your selected server first, then approve the system VPN configuration.
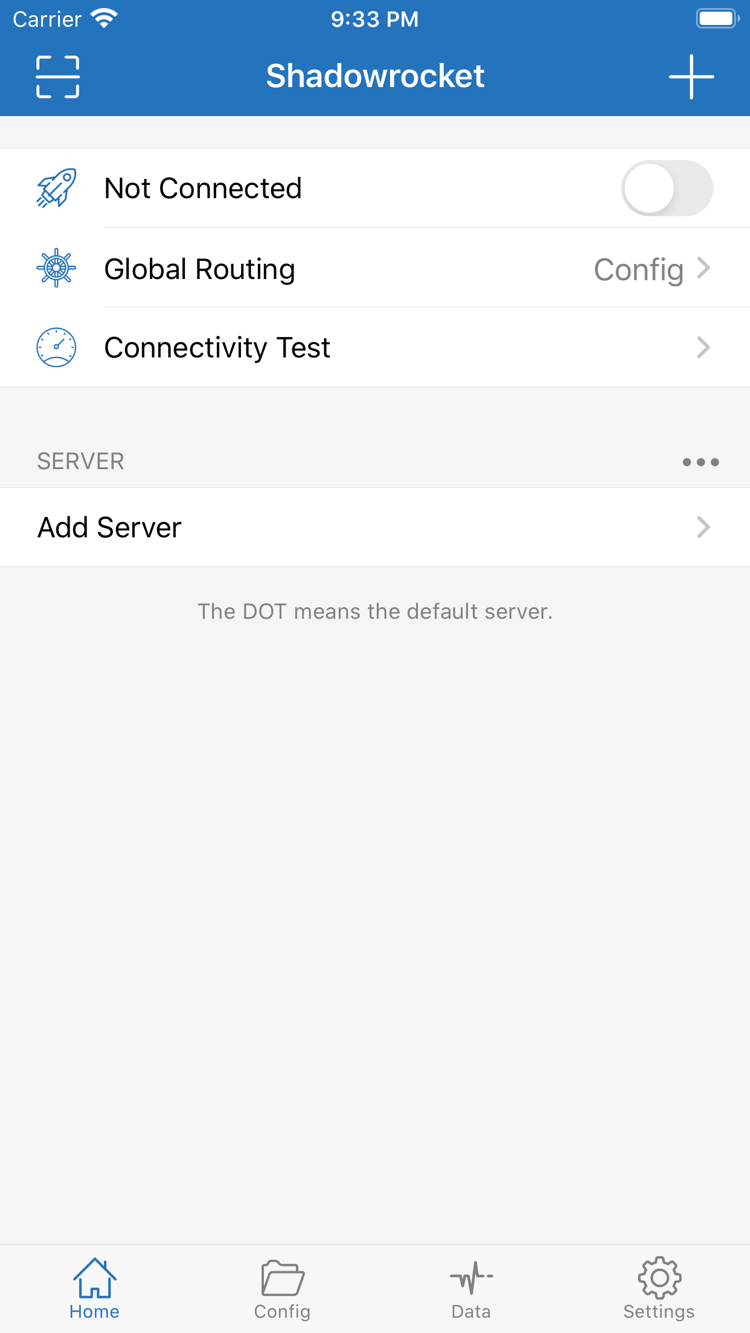
After completing the first two steps, return to Home and check the selected server and Global Routing mode again. If your subscription contains multiple entries, importing it doesn’t necessarily select the server you want. Tap the entry, confirm it’s selected, then use the connection switch at the top. Don’t change servers, edit rules, and repeatedly toggle the connection at the same time; it’ll be difficult to tell what caused a change.
First-Time Connection Prompt
When the top of the screen shows Not Connected, turn on the connection switch. The first time you connect, the system may ask to add a VPN configuration. Confirm that you initiated the action in Shadowrocket, review the prompt, allow it, and complete device authentication as required. This authorization sets up the network tunnel the app needs. It doesn’t mean the subscription loaded successfully or that the server has been verified. If you previously denied authorization, watch for the system prompt when you try again.
If the switch turns off immediately, first check for a system prompt that needs your attention, then confirm the selected entry is valid. You can also check the VPN section of your device’s system settings to see whether a configuration exists or is restricted by device management. Don’t delete configurations you don’t recognize. On a managed device, follow your organization’s device management requirements; repeatedly toggling the switch won’t resolve an authorization restriction.
Check Connection Status and Availability Separately
After approving the prompt, wait for the status to change. Don’t tap repeatedly while the connection is being established. A VPN status in the system or an active connection in the app confirms the tunnel state only; it doesn’t prove that every destination is accessible. Proxy authentication errors, failed DNS lookups, or unexpected routing rules can occur even while the switch stays on. Next, run Connectivity Test and verify access to an actual destination.
Keep the current network stable during your first check. Avoid switching back and forth between Wi-Fi and cellular data. If another device feature can establish a VPN connection, check which one the system is actually using so you don’t mistake a replaced connection for a server failure. When you’re done testing and want to disconnect, return to Home, turn off the top switch, and confirm the status shows disconnected.
If the connection stays on, continue to the next step and check actual requests. If it won’t stay on, jump to Troubleshoot Issues and start with authorization and basic settings. Changing a lot of Rule entries isn’t a useful first step when the connection hasn’t been established; you can’t assess rule-based routing yet.
04 · Verify the Connection and Rules
Check test results, actual access, and rule matching separately.
Once the connection stays on, tap Connectivity Test on Home and wait for it to finish. Check whether the test completed and returned a usable result, then open a website or app you actually need. A single test covers only its chosen target and method; it can’t confirm that every domain, protocol, or app works. Likewise, one failed test target doesn’t prove the entire connection is unusable.
Check Actual Access, Then Compare One Variable
Choose a destination you know should be accessible and check whether it loads fully, not just whether the first screen appears. Missing page content could mean different resource domains are using different rules, or the destination itself may be having issues. You can try another known destination, but don’t change the server, mode, and test method all at once. Note the current network, server, mode, destination, and result to make the comparison useful.
If a request fails in Config, temporarily switch to Proxy and test the same destination using the same server. If Proxy works but Config doesn’t, first check that the intended configuration is active and whether the destination domain matches DIRECT, REJECT, or another unexpected policy. If Proxy also fails, investigate server reachability, authentication, and transport settings rather than adding more domain rules.
If you need to check Direct, treat it as a comparison condition only: Direct working doesn’t confirm that the proxy server works. Existing connections may be reused after switching modes, so make a new request if needed. When the comparison is done, restore your usual Global Routing mode so you don’t accidentally leave Proxy enabled when you need your normal routing rules.
Latency Results Don’t Measure Sustained Speed
Connectivity Test helps assess connectivity under the current test conditions; it does not guarantee sustained throughput. If the test looks good but pages load slowly, consider local network quality, the destination’s response, transport settings, and server-side conditions separately. A lower number isn’t necessarily better for every use case, and one brief test can’t replace checking the tasks you actually need to perform.
If you need logs to review routing, check relevant requests and errors only while troubleshooting. Focus on the destination, matched rule, and applied policy. Before sharing troubleshooting details, redact subscription URLs, authentication fields, and other personal data. For more about rule matching order, see the Rules Reference. To finish the basic check, confirm that the connection stays on, the destination is accessible, and the routing mode is as expected.
05 · Troubleshoot Issues Step by Step
Narrow down the cause, change one thing at a time, and retest the same destination.
Before troubleshooting, identify where the failure occurs: no entry was imported, the switch won’t stay on, both tests and browsing fail, only some destinations fail, or the connection drops after changing networks. Separating symptoms preserves useful clues better than repeatedly deleting and recreating settings. Check the following layers from basic to specific; there’s no need to change settings you’ve already confirmed are working.
Import Fails: Check the Original Details
If no entry appears after saving a Subscribe profile, check that the URL is complete and still valid, and that your current network can reach the subscription. Retrieving a subscription and connecting to a server are separate processes; an existing entry working doesn’t mean the update URL is reachable. If adding a server manually fails, compare Type, Host, Port, authentication fields, and transport parameters against the original details. Don’t rely on memory or switch Method values at random.
Connection Fails: Check Authorization, Network, and Server Details
If the switch turns off immediately, check system VPN authorization or configuration restrictions first. If it stays on but all tests fail, disconnect, confirm the device itself has network access, then reconnect and test again. If possible, compare using another network you can access. If the issue occurs only on one network, note the difference rather than changing every setting that was already correct. Check server authentication and transport settings against your own details.
Some Destinations Fail: Check the Mode and Rules
If only certain destinations fail, check Global Routing first, then compare results in Config and Proxy. Review the order and policies of the relevant DOMAIN, DOMAIN-SUFFIX, IP-CIDR, and FINAL rules in the active file. In particular, check whether an earlier rule is already matching. If DNS may be involved, note the current configuration and symptoms before reviewing the relevant settings. Changing DNS is not a universal fix.
Settings: Check Test Conditions and On Demand Behavior
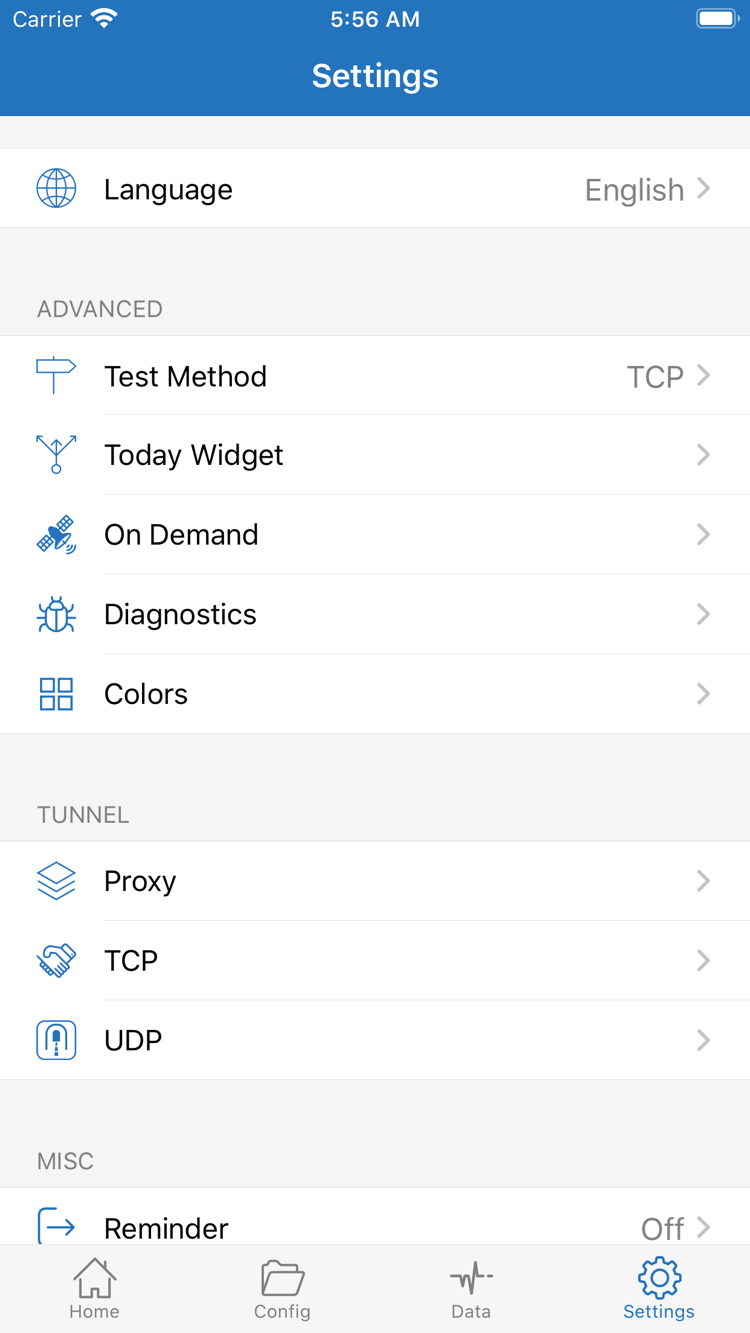
In Settings, review Test Method and confirm that it’s suitable for what you’re troubleshooting. Different methods can produce different results. If you change the method, note that the test conditions have changed; don’t compare the results as if they came from the same measurement. Use Language to check the interface language. Today Widget isn’t required for a basic connection, so there’s no need to change it during an initial test.
On Demand controls when a connection starts under specified conditions; it doesn’t replace server settings or Rule. If automatic connection after changing networks doesn’t behave as expected, check your existing On Demand conditions. First confirm that a manual connection works, then adjust the automatic trigger. Don’t turn on every automatic option to fix one connection failure, or you won’t know what triggered a reconnection.
Diagnostics can help you review troubleshooting information. Before sharing it, check for server addresses, destinations, or authentication details. Proxy, TCP, and UDP in Settings are options for further investigation; they don’t all need to be changed. For protocol-specific options, check them against your configuration. Don’t change a default just because the option appears in a screenshot.
Restore a Working Connection Before Tidying Your Configuration
After each change, retest using the same destination and method. If it doesn’t help, restore the previous setting before checking something else. Once you find an effective adjustment, note why it worked, remove duplicate entries created during testing, and confirm Global Routing and On Demand are back to the intended settings. For more on configuration sections, rule priority, and policy syntax, see Rules and Configuration Reference. To repeat the setup steps, return to Add or Import and follow this guide in order.